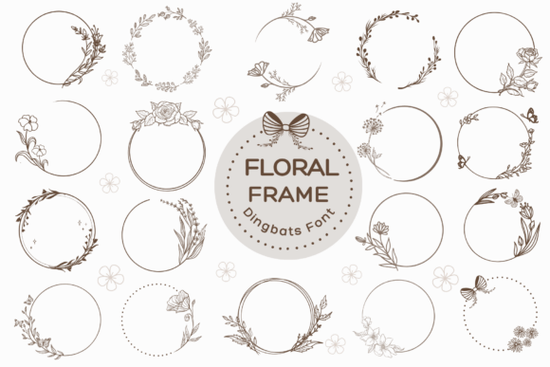
If you are looking to add hand-drawn borders to your projects without spending hours sketching each curve, a decorative typeface is the fastest way to get consistent results. The Floral Frame Font solves this by giving you ready-made wreaths and floral outlines that work like standard letters on your keyboard. Instead of manually tracing clip art or building vectors from scratch, you just type a key and the corresponding frame appears. This approach saves time for small business owners, print-on-demand sellers, and creative hobbyists who need to scale their layouts quickly while keeping a polished, artistic feel.
How do you actually use dingbat fonts for custom projects?
Dingbat fonts replace standard characters with illustrations, which means you do not need advanced vector software to place them on a canvas. You simply open your design tool, select the typeface, and press the keys mapped to the glyphs you want. For example, typing shift + A might pull up a full circular wreath, while shift + C could give you an open-bottom frame perfect for wrapping around text. You can treat each glyph as a standalone shape, resize it without losing quality, and adjust the tracking so it sits exactly where you need it. If you are new to this workflow, reviewing the glyph map and installation notes will save you from guessing which key produces which design.
What kind of projects work best with botanical borders?
Because each glyph is pre-drawn with natural brush strokes and leaf details, these frames fit naturally into print and digital layouts that call for a soft, elegant aesthetic. Wedding invitations, event programs, and boutique product tags look cleaner when you drop in a cohesive frame instead of mixing random graphics. Print-on-demand sellers often use them to build mug wraps, tote bag layouts, and greeting card covers that feel handmade but print sharply at high resolutions. Crafters can also export the glyphs as SVG files and send them straight to cutting machines for paper doilies, vinyl decals, or layered cardstock projects. The key is matching the botanical style of the frame to the overall mood of your piece.
Are there any spacing or compatibility issues to watch for?
Like all decorative typefaces, dingbats can sometimes overlap or sit too far apart when placed at small sizes. Always preview your layout at 100% zoom before exporting, and make sure you are working in CMYK if you plan to send files to a professional printer. Most modern design software handles these fonts without trouble, but you may need to switch your text tool to standard spacing rather than optical alignment. If a glyph looks pixelated after resizing, double-check that you are using the original file instead of a low-resolution screenshot. When in doubt, convert the text layer to outlines so the program no longer reads it as live type. You can find the official version of Floral Frame Font on the marketplace, which includes all necessary formats and commercial licensing details.
Which letter styles pair cleanly with floral outlines?
A heavy serif or a thin handwritten script can easily clash with detailed botanical borders, so visual balance matters. Clean sans-serif fonts usually give the frames room to breathe, while a light italic adds a touch of movement without competing for attention. Stick to two typefaces per layout: one for the main message and one for secondary details like dates or location text. Keep line spacing loose enough that leaves do not collide with punctuation, and use a neutral background color to make the dark strokes pop. If you are selling digital templates, include a few mockups that show the frames in use so buyers can visualize scale before they start editing.
Quick steps before you export your final design
- Open the glyph panel in your design software to preview every frame before typing.
- Test at actual size by zooming to 100% and checking for cut-off edges or tight overlaps.
- Convert to outlines once placement is locked, so the design stays sharp on any computer.
- Verify your license matches your intended use, whether that is personal crafts or commercial sales.
- Save a vector master alongside your final image file for future edits.
Start with one simple layout, adjust the frame size until the negative space feels balanced, and then apply that same approach to your next project. Consistent spacing and clean file management will keep your workflow fast and your finished pieces ready for print or digital sharing.
Learn More Melintina Calligraphy Font | Elegant Design Ideas & Uses
 Crafting with Pickled Lime Serif Typography
 Sweet August Font: a Designer's Guide to Creative Typography
 Cactus Ridge Font: Creative Design Ideas & Uses
 Ankle Biter Font Projects & Download Instructions
 Grave Shade Font: Tips for Gothic Typography